Stoup (stew + soup) : Red lentils with squash and spinach

food


We often overlook the simpler ingredients when devising a healthier food plan, we think we need the fancier stuff and equipped with the usual excuse of, ‘its so expensive to eat healthy!.’ Its not. 

Lentils are one of the best food source of slow-digesting carbohydrates! Perfect for lunch! It is an excellent source of fiber, folate, manganese and iron. It’s especially great because it is not like the usual carbohydrates like white rice or bread where your sugar levels spike immediately after consumption instead it takes its times to convert to glucose. Along with these, it has been proven that it aids colon health, diabetics and absorption of essential minerals like calcium. 

Available everywhere and you can make it so delicious by simply boiling it and adding your favorite vegetables, even if you cant boil an egg you can boil lentils! 

So this is what I made for lunch today, again it is extremely versatile to carry out and you can make it for 2/3 days at a time. 


What do you need?

1 cup of red lentils

2 cups of butternut squash
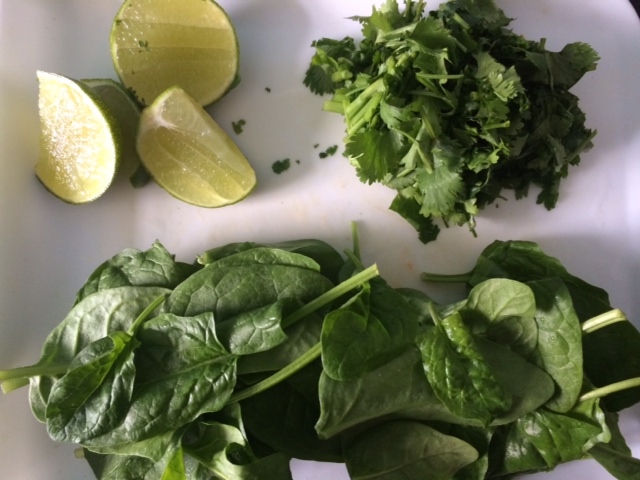
2 cups of spinach

1/2 cup of cilantro

3 tsp of turmeric powder 

1 cup of cooked brown rice

Sea salt to taste 

This should yield 4 to 5 servings ( each serving is 1.5 cups)


image-6 image-12

Clean the red lentils under water until it runs clear

Cover the lentils with water making sure it is completely submerged. Add the turmeric powder and salt.

On medium heat, boil the lentils for about 10 minutes 

Add in the butternut squash and cover the pot and let it simmer until the squash and lentils have completely softened. 

Using a masher, mash the squash and lentils as it simmers 

image-7

Add in the spinach 

image-11

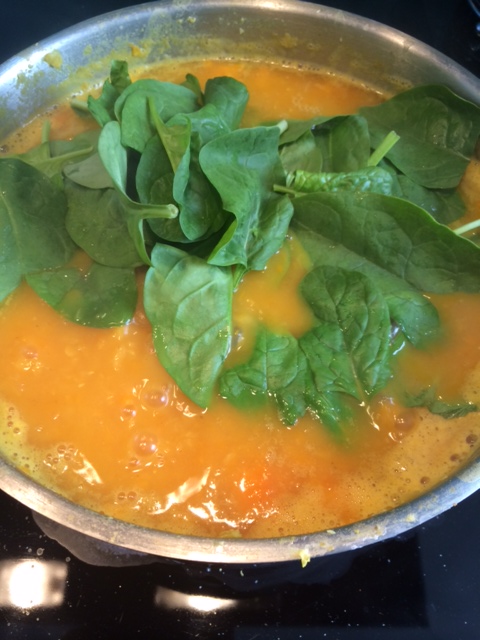
Mix together until the spinach wilts and take a taste. Beware it’s super hot! I say this from experience! Ouch!

Add in the cilantro 

image-10

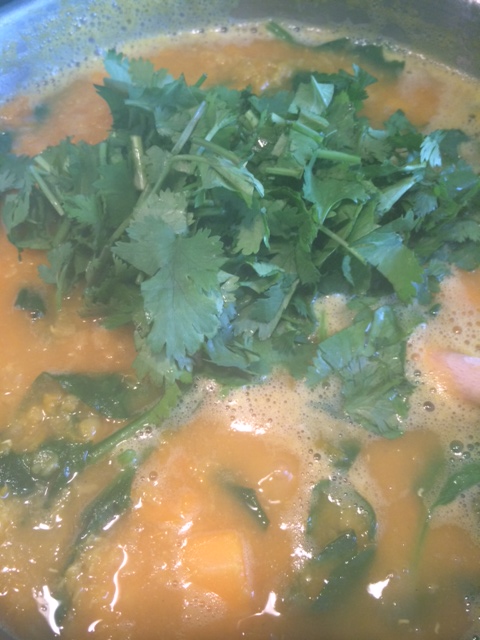
Allow it to simmer for an additional 5 minutes under very low heat. It’s ready! 

Spoon the stoup (stew + soup) into a bowl and add a tablespoon of brown rice. The combination is perfect! 

image-9

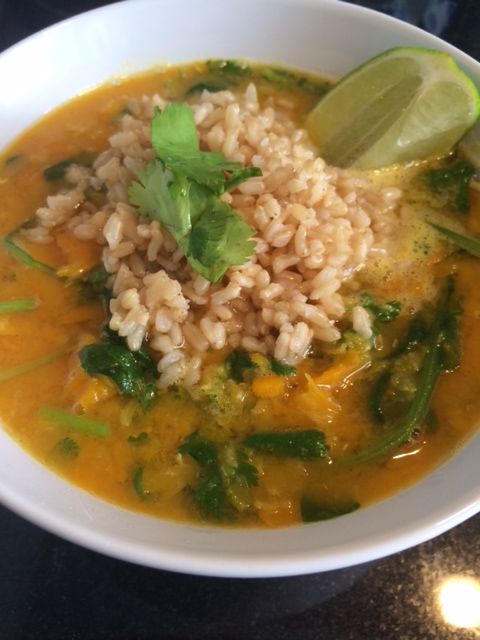
Enjoy! No fats, good carbs and lots of vegetables!

You can add any vegetables you want, pumpkin, beans, jalapeños, tomatoes, the list goes on and on! You can even skip on the rice but the texture really adds a little something. 

It was a perfect meal on this cold London afternoon especially on a day I was feeling extremely homesick . 

Lunch: Vegetable fried rice

food

Lunch is one of those meals that really helps you get through the day! There are such high expectations from lunch, it needs to fuel you and must be versatile enough to take to work/school/etc. Here’s a recipe that fits the bill, it’s packed with nutrients, you can make it once for 2/3 days and it’s holds well to carry out.

Remembering the 70:30 ratio of vegetables:carbohydrates I will give you only an approximation of how much vegetable you should add. Please feel free to add more!

Every household usually has their own fried rice recipe, stir fried vegetables, eggs, protein, rice together….but remember no mixing carbs and proteins! Here’s the trick to avoid stir frying those beautiful vegetables in oil and stripping it off it’s nutrients.

Steam them first! The steamer is my new best friend!


What will you need?

1 cup cooked and cooled brown rice
1 cup broccoli
1 cup carrots
1 cup mushrooms
1 cup green/red peppers
2/3 cloves of chopped garlic
1/2 cup cilantro
1/2 cup spring onions
1 tbsp low sodium soy sauce
Sea salt to taste

Cook and cool the brown rice

20140430-181247.jpg

Steam the broccoli, carrots, peppers and mushroom till just tender. Make sure they don’t get soggy.

20140430-181223.jpg

In a hot wok, add 3 sprays of your oil of choice and toast the garlic. Add in steamed vegetables and stir.

20140430-181901.jpg

Add in the brown rice and stir together. Add salt to taste and soy sauce.

Mix well and add in chopped cilantro and spring onion. Mix together and serve!

20140430-181735.jpg

You can add a medley of vegetables to your liking. Corn and peas are a great addition! Store extra fried rice in air tight container and it will stay well for 4/5 days in the fridge. This should make you at least 4 servings!

20140430-181957.jpg

Enjoy!

Homemade fresh vanilla almond milk

food

| Why almond milk? |

It is one of the most nutritionally valuable milk substitutes available today which is free of lactose, gluten, casein, cholesterol and saturated fats!

It contains a large number of minerals and vitamins like calcium, iron, zinc, vitamin E, potassium amongst others. Almond milk is also low in calories, at only 40 calories and 3 gm of fat/ 8 oz serving whereas cow’s milk stands at 146 calories, 8 gm of fat, 5 gm of saturated fats and 24 mg of cholesterol/ 8 oz serving! Now you do the math 😀


| Ingredients needed to make this goodness |

1 cup raw almonds | 2 cups water | 2 tsp Madagascar bourbon vanilla extract | 1 tbsp raw organic honey | few drops of liquid stevia to your liking | 

IMG_5331

Cover the almonds with water and let it soak overnight | Drain and rinse the almonds before use

IMG_5332

 Add almonds and 2 cups of water and blend for 1 minute

 IMG_5335   IMG_5333

IMG_5334

Add vanilla, honey and stevia (as pictured) and blend for a further 30-40 seconds

You can drink the milk as is if you like a course texture but for a smoother finish, line a bowl with cheesecloth and strain the milk through.

IMG_5337

The milk stays for around 4 days refrigerated and do not throw the almond remains in the cheese cloth!

IMG_5349

 Take the remains and on lowest oven setting dry it out and run it through a food processor for fresh almond flour | Recipe for chocolate chip cookies with this almond flour to follow!


Enjoy!

Homemade body butter | Handmade with love

Lifestyle


 There is an alarming rate of harmful ingredients in the products we use on a daily basis. We hardly ever think about the creams we apply on our skin everyday especially when it is tagged with a fancy brand name. The skin has a remarkable capability to absorb whatever you apply on it and eventually it reaches the bloodstream, about 85% of what you apply goes beyond the first layer of protection. A great site to check your products is Environmental working group’s Skin Deep.

Once you have realized how scary all the ingredients involved are, you can turn to this amazing homemade organic body butter which is super easy to make! It also makes a really thoughtful gift for your loved ones.

IMG_4410


Things you need

 Organic unrefined shea, cocoa, avocado, aloe vera and mango butters + Organic virgin coconut oil + Vitamin E (you can add however much you prefer and available on amazon)

A large pot

Electric beater

Jars


IMG_4320

Step 1

You will need the following organic butters/oils. They are solid flakes and look nothing like what you would expect. You can add them in any ratio according to your preference.

IMG_4321

Step 2

This is the cocoa butter. Add each butter into a big pot on very low heat and let it melt like the next photo. Then add the next butter.

IMG_4322

Step 3

Stir slowly till all the butter has melted 

IMG_4323

Step 4

Wait to cool slightly and place the pot in the refrigerator

IMG_4324

Step 5

Cool till the butter looks like a cream and not translucent. This will take between 1 to 2 hours.

Then take it out of the refrigerator and let it stand for for 15 minutes.

IMG_4325

Step 6

Use an electric beater to whip the mixture into fluffy cream, you will really feel like eating it!

IMG_4326

Finally

 Place into jars and refrigerate the extra ones that you won’t use straight away. Take a small amount in between your hands and rub together to release the oils then use where needed.  I did not add any extra essential oils for smell, you can add lavender/lemon or any other essential oils according to your liking! Lastly, I added the ‘handmade with love’ sticker from etsy! Just an extra special touch!

 I made 10 120ml jars of body butter!


Enjoy!