Sweet & spicy and garlic & lime chicken dinner

food

Planning dinner really gets me frustrated! There is no room for cheating or mistakes and when you are as exhausted as I am at the end of the day a one dish oven chicken dish sounds just about perfect!

Chicken breasts are a great source of lean proteins and with the availability of cleaned and cut chicken breasts this is easy peezy! I did add in boneless chicken thighs in my dish, feel free to use whichever pieces you like but remember this recipe is measured for boneless pieces!
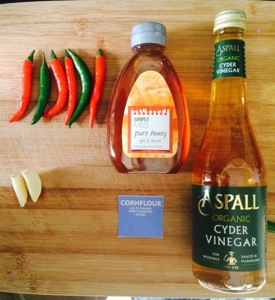
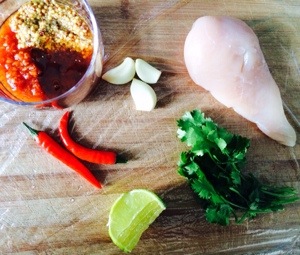

 What do you need?

20140520-204348.jpg

You can adjust the measurements if you are cooking for 3 or more people. I made enough for 3 persons.

4 boneless chicken breasts and thighs

1.5 tablespoon of olive oil

A mix of chili sauce, honey and whole grain mustard, a tbsp of each. However if you have made the amazing sweet chili sauce you can use 2 tbsp of that and add a tbsp of mustard of choice. Also in that case decrease garlic to just one clove as the sweet chili sauce contains garlic. (I hadn’t tried out the sweet chili sauce when I cooked this!)

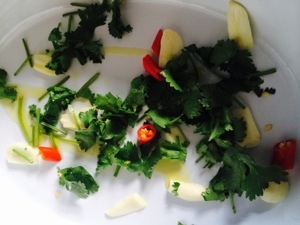
2 garlic cloves, roughly chopped

2 – 3 red or green chilies, chopped

Juice of half a lime

Roughly a cup of chopped cilantro

2 tbsp water

Salt and pepper to taste


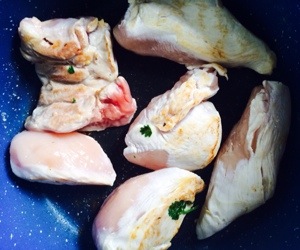
 Wash the chicken pieces and pat dry

Make sure to place a cling wrap over your cutting board when cutting raw pieces of meat. The juices get soaked into the boards, especially if they are wooden and basically the bacteria harvests in there and you do the math! Ech! Always remember to cling wrap your boards, may it be plastic, granite or wood when handling raw meats or fishes!

Cut the pieces into equal sizes, this completely depends on you! But make sure they are roughly equal so that they cook evenly.

Sprinkle with salt and pepper

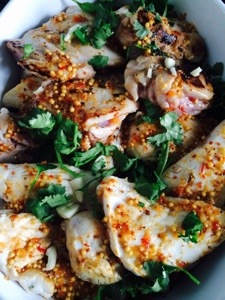
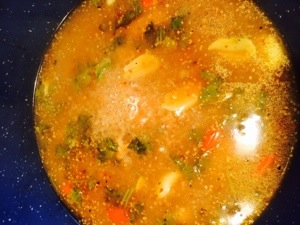
Mix sauces together with the juice from the lime and add 2 tbsp of water. Mix and set aside.

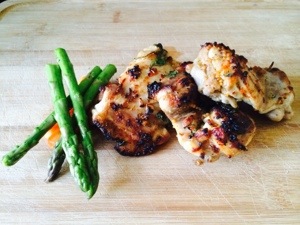
Under medium heat, put half of the oil and sear the pieces to give some color and lock in the juices

20140520-204421.jpg

Preheat the oven to 250 C ( I use a fan oven)

Place the remaining oil, cut chilies, cut garlic and half of the cilantro into an oven proof dish

20140520-204404.jpg

Transfer the pieces into the prepared dish, try not to crowd them too much and then cover each piece completely with the sauce. Leave some to add on after the cooking process.

20140520-204438.jpg

Place it in the oven and watch the cooking and caramelization happen!

20140520-204451.jpg

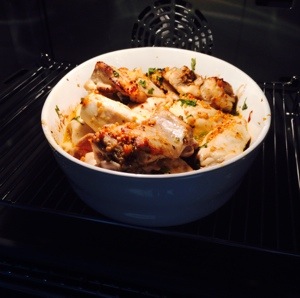
It should take 30 – 35 minutes before its done. Turn the pieces half way through. The chicken is cooked when you insert a toothpick and the juices run clear! You can even take a piece and cut it to make sure! No one’s judging here!

Transfer the chicken into your serving dish and cover with foil.

Take the drippings from the dish and reduce it down. You can add in a tsp of cornstarch mixed with water to get a thicker sauce but honestly it’s not necessary!

20140520-204504.jpg

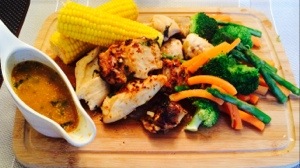
Serve the chicken in slices or whole, smear it with the remaining sauce and garnish with cilantro.

Serve with a side of steamed crunchy vegetables!

20140520-204517.jpg

This is easily a dish you can make for many people, its hassle free and you can really skip the searing part if you are feeling extra lazy!

20140520-205249.jpg

Enjoy!


Sweet chili sauce: Just the way you like it!

food

20140518-015528.jpg

It’s been 4 months that I’ve been following this new cleaner lifestyle and I realized that I was constantly looking for the sweet and spicy flavor in my dishes. You might have noticed in my recipes that I was constantly making the honey + chili combination!

Before that I was using store bought sweet chili sauce which has a shelf life of more than 1 year and obviously full of the ‘bad’ stuff. One of the major hurdles of leading a healthy life is the addition of condiments, most of them are full of sugars and preservatives! It’s such a necessary but unnecessary addition!

So, while trying to come up with a new chicken recipe, I thought out the way I could bottle this sweet chili sauce! And it worked!!

I ordered these jars even before trying it out! 😀


What do you need?

1 cup honey
1/2 cup water
1 1/2 tbsp vinegar (I used apple cider vinegar it’s healthier)
1 tbsp lemon juice
Red and green chilies ( the amount depends on how spicy you want it)
3/4 cloves of chopped garlic
1 tbsp of cornstarch with 1.5 tbsp of water

You will make 6 110ml jars!


20140518-114506.jpg

Sterilize the jars by placing them in a hot oven for 15 to 20 minutes. Be careful when taking them out!

20140518-114450.jpg

On low heat, bring the honey and water to a simmer and add in the chilies and garlic

Continue to simmer for 5 minutes then add in the vinegar and lemon

Simmer for a further 5 minutes and add in the cornstarch and water mixture. Keep whisking slowly until sauce has thickened.

20140518-015413.jpg

Fill the jars with the sauce and keep open to cool completely.

20140518-015438.jpg

20140518-015429.jpg

Once cool, you can refrigerate and enjoy for up to a month! I doubt it will last that long!

I gave these jars as favors for my husband’s birthday lunch! I was happy to share this healthy change with my loved ones!

20140518-015510.jpg

Enjoy!!

20140518-015650.jpg

Homemade fresh vanilla almond milk

food

| Why almond milk? |

It is one of the most nutritionally valuable milk substitutes available today which is free of lactose, gluten, casein, cholesterol and saturated fats!

It contains a large number of minerals and vitamins like calcium, iron, zinc, vitamin E, potassium amongst others. Almond milk is also low in calories, at only 40 calories and 3 gm of fat/ 8 oz serving whereas cow’s milk stands at 146 calories, 8 gm of fat, 5 gm of saturated fats and 24 mg of cholesterol/ 8 oz serving! Now you do the math 😀


| Ingredients needed to make this goodness |

1 cup raw almonds | 2 cups water | 2 tsp Madagascar bourbon vanilla extract | 1 tbsp raw organic honey | few drops of liquid stevia to your liking | 

IMG_5331

Cover the almonds with water and let it soak overnight | Drain and rinse the almonds before use

IMG_5332

 Add almonds and 2 cups of water and blend for 1 minute

 IMG_5335   IMG_5333

IMG_5334

Add vanilla, honey and stevia (as pictured) and blend for a further 30-40 seconds

You can drink the milk as is if you like a course texture but for a smoother finish, line a bowl with cheesecloth and strain the milk through.

IMG_5337

The milk stays for around 4 days refrigerated and do not throw the almond remains in the cheese cloth!

IMG_5349

 Take the remains and on lowest oven setting dry it out and run it through a food processor for fresh almond flour | Recipe for chocolate chip cookies with this almond flour to follow!


Enjoy!

Homemade body butter | Handmade with love

Lifestyle


 There is an alarming rate of harmful ingredients in the products we use on a daily basis. We hardly ever think about the creams we apply on our skin everyday especially when it is tagged with a fancy brand name. The skin has a remarkable capability to absorb whatever you apply on it and eventually it reaches the bloodstream, about 85% of what you apply goes beyond the first layer of protection. A great site to check your products is Environmental working group’s Skin Deep.

Once you have realized how scary all the ingredients involved are, you can turn to this amazing homemade organic body butter which is super easy to make! It also makes a really thoughtful gift for your loved ones.

IMG_4410


Things you need

 Organic unrefined shea, cocoa, avocado, aloe vera and mango butters + Organic virgin coconut oil + Vitamin E (you can add however much you prefer and available on amazon)

A large pot

Electric beater

Jars


IMG_4320

Step 1

You will need the following organic butters/oils. They are solid flakes and look nothing like what you would expect. You can add them in any ratio according to your preference.

IMG_4321

Step 2

This is the cocoa butter. Add each butter into a big pot on very low heat and let it melt like the next photo. Then add the next butter.

IMG_4322

Step 3

Stir slowly till all the butter has melted 

IMG_4323

Step 4

Wait to cool slightly and place the pot in the refrigerator

IMG_4324

Step 5

Cool till the butter looks like a cream and not translucent. This will take between 1 to 2 hours.

Then take it out of the refrigerator and let it stand for for 15 minutes.

IMG_4325

Step 6

Use an electric beater to whip the mixture into fluffy cream, you will really feel like eating it!

IMG_4326

Finally

 Place into jars and refrigerate the extra ones that you won’t use straight away. Take a small amount in between your hands and rub together to release the oils then use where needed.  I did not add any extra essential oils for smell, you can add lavender/lemon or any other essential oils according to your liking! Lastly, I added the ‘handmade with love’ sticker from etsy! Just an extra special touch!

 I made 10 120ml jars of body butter!


Enjoy!